Let Laserfiche Take Care of Your Stamps
- CDI
- Sep 21, 2023
- 3 min read

By Kyle Knebel
September 2023 Consultants Corner
Setting up an automatic stamp in Workflow
Whether you use Laserfiche Cloud or Laserfiche on-premise, Laserfiche Workflow has an Apply Stamps action. Workflow can only apply image stamps. They must be marked as Public. Laserfiche Annotations like Stamps are used with Laserfiche scanned TIFF image files only, not e-docs or PDFs.
So, what is required to automatically apply stamps to document images using Laserfiche Workflow?
Step 1:
For image stamps, you should begin by using the Laserfiche Client to create your Public Stamp. As long as you have public stamps available, you can use them in Workflow Designer. If you don’t already have any public stamps, follow the steps below.
Open an image document in the Laserfiche Document viewer and click on the Stamp Annotation icon on the toolbar.

Create a new stamp: This will be either a custom stamp like a date token, or an image stamp created from an imported image file (BMP, PNG, GIF or JPG).

Name and save your stamp as a Public stamp. This is required in order to use the stamp in your workflow.
Step 2:
Create a new Laserfiche Workflow using the Workflow Designer
Step 3:
Add the Apply Stamp activity to your workflow and begin configuring the properties. The Options for Stamp, Appearance, and Placement settings should all be configured on the right side.
The “Stamp” setting can be customized using any Public stamp.
Click the ellipsis button [...] to select an available Public stamp.


The Appearance options allow you to apply color, opacity, and rotation settings.
The Placement options allow you to define what page and where on that page to place the stamp.
Merging options exist if a stamp of the same type already exists.

Stamp Protection: You can also set the “Protection” level on this stamp. What do these protection levels mean and what would be best practice?
BEST PRACTICE: A Public Stamp allows any user in your organization with enough rights to annotate a document to use or edit this stamp from any computer. This would be recommended best practice in a workflow like this.
A Private Stamp is like a personal stamp in that it is visible only to its creator. This would not be common in a workflow like this.
A Protected Stamp will only be available to the user that creates it and may only be modified by its creator or the document owner. This would not be common in a workflow like this.
Step 3:
Publish the workflow and set the Conditional Start Rule.
You want to make sure that any document that gets annotated by this workflow does have image pages, so let’s build the rule to check. When publishing the workflow for the first time, it will ask you if you want to create a condition rule.

Step 4:
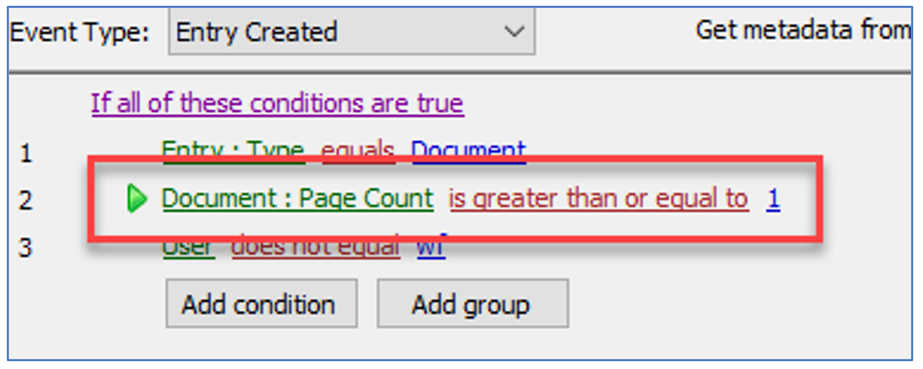
Set the conditional start rules in the wizard and, in this case, define a condition to check that the document has image pages on which we can apply the Stamp annotation.
In the example below, the start rule is running when the document is created and then in the 2nd condition, checks for a page count. This will ensure that the workflow doesn’t terminate and will apply the stamp, although you should make sure that the page count matches the page on which you are applying the stamp. It would not do any good to check for documents with at least 1 page, but apply a stamp on page 10, when the document only has four pages. Logically it passed the test, but the activity would fail.

Step 5:
Publish the start rule and test by uploading or scanning a new image page document to the repository.
You’ve now created a workflow to apply a stamp to your documents. It should look something like the example below.

We hope you learned a new Workflow capability today!
See you next month, and have a Great Paperless Day from CDI!

CDI NEWSLETTER
Stay updated with all the latest Laserfiche news, CDI webinars, blogs, and more!

Comments