


By Kyle Knebel
Laserfiche Workflow has the tools to help us create good-looking HTML formatted emails. This month’s article will show some of the activities and techniques you can use to build well-formatted emails using HTML. Along the way, you’ll possibly learn some HTML coding tricks, too.
Here at CDI, we send our clients, upon request, a Case Summary with billed hours report via email. Here is an example.

A very simple email with a table and hyperlinks to Web Client documents might look something like this.

To build an email that uses HTML tables, like the one above, you’ll need to create workflow tokens that hold HTML and the data to be formatted. And you’ll format the entire table as “HTML” within the email body. Follow along in this step-by-step.
In our example, let’s use the following scenario. We want to send a weekly email that lists the documents created in the past 7 days. And we want to have live hyperlinks to each one of those documents.
Step 1:
In the workflow, we first need to run a search for the documents created this week using the “Search Repository” activity.
We need to get a date 7 days from the day this workflow runs (It should run Sunday evening). The Date Token Calculator activity can do this. Configure it to subtract 7 days from the current date.

Create the search and enter the search criteria using the “7 days ago” date token in the search syntax. I used this syntax: {LF:Name="*", Type="D"} & {LF:Created>="%(DateTokenCalculator_7 days ago)"}. Note: When possible, use the Advanced Search in the client and open the Search Syntax window to copy the search syntax and paste it into the workflow.

Step 2:
We need to build a token that holds the table header columns and allows the documents list to be appended to this token. Our report will have three columns: CreateDate, EntryID, and Doc Name.
Add the “Assign Token Values” activity. I renamed this activity as “Set HTML Header and Rows.”

Press the “Create…” button. I named this new token, “Report”. (You’ll use this in Step 5)
I also checked the box to “Allow token to have multiple values.”
In the first row we are going to insert some HTML. This will define the header columns. Insert the following HTML:
<tr> <th>CreateDate</th><th>EntryID</th><th>Doc Name</th> </tr>
<tr> means start of Table Row; </tr> means end of table Row
<th> means start of header cell; </th> means end of header cell

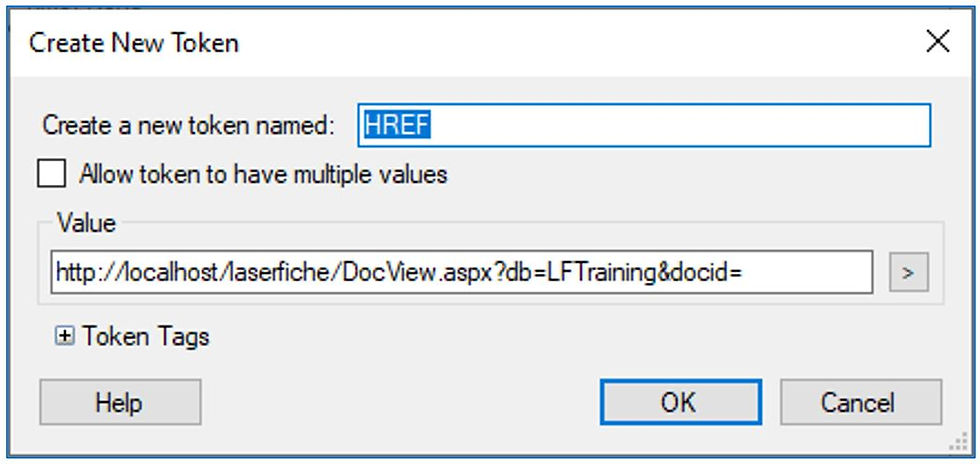
Step 3:
We need to create a token to hold the Web Client URL reference (called an “href”, the href attribute specifies the URL of the page the link goes to). This will create the correct hyperlink to open the document through the Laserfiche Web Client.
Add the “Assign Token Values” activity and press the “Create…” button. I named this new token “HREF.” I renamed the activity “Set HREF.”

In the first row we are going to enter your Web Client URL and some code to open the document viewer to the correct document.
Enter “HTTP://{webserver}/laserfiche/DocView.aspx?db={repositoryName}&docid=”
Step 4:
Next, we need to iterate through the output entries from the “Search Repository” activity to add each document to the HTML table token we created in step 2. But we only want to do this if there is a search result.
Add a “Conditional Sequence” activity and set the condition for the search result count is greater than 0.

Within this sequence, drop the “For Each Entry” activity, and connect it to the Search Repository activity.

Within the For Each Entry activity, we need to add the “Find Entry” activity in order to gather each document’s creation date (This date is not available from the For Each Entry activity itself). I renamed mine to “FindForEachEntry” to keep myself from getting confused!

Set the Entry to Find with ID: value as the “ForEachEntry_CurrentEntry_ID” token.

The Workflow should look something like this so far:

Step 5:
Next, you’ll add a token that modifies the “Header and Rows” token. This activity will add each document’s information to the table. So, if the search returned 5 documents, this activity would append 5 rows below the header row. The table would end up having one header row and 5 lines for each document.
Within the For Each Entry activity and just after the “FindForEachEntry”, add another Assign Token Values activity. This time, press the “Modify…” button in the properties box and choose the “Report” token from the “Set HTML Header and Rows” you created in Step 2.

Make sure to select the “Append to existing values option.
Insert the <tr> html beginning of the row markup.
Insert a <td> markup to indicate a new cell.
Insert the Creation Date token from the “FindForEachEntry” activity.

Insert the </td> markup to indicate the end of the cell.
On the same line, insert another <td> markup to indicate the start of the cell.
Insert the OutputEntry_ID token from the “FindForEachEntry” activity.

Insert the </td> markup to indicate the end of the cell.
The next steps are where the magic happens. You’ll be creating the hyperlink to the document in the Web Client.
Still on the same line, add “<td><a href=”
Following the =, insert the token HREF from the Set HREF token you created in Step 3.
Immediately following, insert the CurrentEntry_ID token and put a “>” on the end. It should look like this: <td><a href=%(HREF)%(ForEachEntry_CurrentEntry_ID)>
Following the “>”, insert the %(ForEachEntry_CurrentEntry_Name) token
Insert the </a> markup to indicate the end of the Web Client URL reference.
Complete the table by inserting </td></tr> at the end of this long string of markup. It should look something like this:
<tr><td>%(FindForEachEntry_OutputEntry_CreationDate)</td><td>%(FindForEachEntry_OutputEntry_ID)</td><td><a href=%(HREF)%(ForEachEntry_CurrentEntry_ID)>%(ForEachEntry_CurrentEntry_Name)</a></td></tr>

The workflow should look like this so far:

Step 6:
And finally, we need to email the report with its HTML table formatting.
Insert the Email activity into the For Each Entry section just after the “Append rows to the Report Token: and edit the properties of the Email activity.
Set the To: recipient and the Subject line
Edit the body of the text as you see fit
Next, we will edit the body and add the table to the email. Press the “Email Editor…” button.

Type in the HTML markup shown below in order to add the table formatting. Into the Table markup, you’ll add the “Report” token, as you can see highlighted in the image below.
Add: <table style="width:100%" border="1"></table>

Just before </table>, place your cursor and insert the Report token by clicking the “Tokens” button in the editor:

In the pop-up window, scroll down the list of tokens on the bottom-left, and expand “Set HTML Header and Rows” and click on the blue “Report” link.

Next, before closing this window, select the word “Report” at the top left of the box.
Apply the additional properties as shown below in steps 1-4 in the screenshot below. This will create the correct HTML markup around the table, resulting in a finished, well-formatted HTML table in your email.

The workflow should look like this now:

After publishing the workflow, make sure to set it to run on a schedule rather than a conditional start rule.
We hope you’ve learned some new techniques and knowledge to get you started on making your own custom HTML formatted emails!

CDI NEWSLETTER
Stay up to date with all the latest Laserfiche news, CDI webinars, blogs, and more!
Comments